One Cosmo editor shares her honest thoughts on the treatment along with info on how it works, what it felt like, and her results.
I think there’s a procedure for just about everything these days. Dimpleplasty? Yup. Ear pinning? Check. Sucking away your fat while you’re wide awake with only laughing gas and a prescribed Xanax? Yes, this exists too—it’s called AirSculpt, and I tried it. Similar to laser liposuction, this procedure is a form of fat removal marketed as less invasive than traditional lipo thanks to faster downtime and less pain. I’ve tried just about everything to address my love handles (hi, diet, working out, noninvasive body contouring), and I’ll attest: My before-and-after AirSculpt results are truly shocking—my back and waist fat are permanently gone.
To preface, I’ve never been overweight, but societal pressure and harmful beauty standards led to body dysmorphia in my youth and a never-ending cycle of yo-yo weight gain and loss. I have always had stubborn fat around my waist, and although I’ve learned to accept it over the years, I never truly liked it (but that’s a story for another day!). So when I had the chance to try AirSculpt on my love handles, I took it. (FYI, I received this procedure at a reduced cost as a beauty editor to write this review.)
Even though AirSculpt is less invasive than other fat removal alternatives, it is still a very real surgery, so it’s important that you’re in a healthy relationship with your body and armed with all the facts prior to considering a treatment. So before I committed to AirSculpt, I did a ton of research on the procedure and now? I’m sharing all the info with you—along with the details of my personal experience below.
What is AirSculpt?
AirSculpt is a form of liposuction designed to remove fat from specific areas of your body. While it shares similarities with traditional liposuction, it stands out in a few key ways. “AirSculpt is performed while the patient is wide awake, it’s less invasive, and it comes with a quicker downtime," says board-certified plastic surgeon Adam Schaffner, MD, who performed my AirSculpt procedure. If you’re questioning right now how that is even possible, I, too, had my hesitations—that was until I went through it myself (but more on that below).
“The mechanical nature of AirSculpt enables us to pluck fat cell-by-cell, giving surgeons enhanced finesse and precision to customize results,” says Dr. Schaffner. Translation: It’s a gentler liposuction technique that offers more targeted fat removal, leading to quicker recovery and less scarring compared to traditional methods, as explained by board-certified plastic surgeon Jennifer Levine, MD, previously to Cosmo.
The secret behind AirSculpt’s effectiveness is its vibrating cannula, which moves 1,000 times per minute. This motion breaks up fat cells before they are carefully removed one by one—in contrast, traditional liposuction is more aggressive, using a scraping motion to remove fat. The AirSculpt procedure can take anywhere from 45 minutes to 4 hours, depending on the amount of fat being removed and the areas being treated.
If you’re targeting areas prone to sagging (i.e., arms, inner thighs, stomach) or if you have reduced skin elasticity due to age, pregnancy, or weight loss, you can combine your AirSculpt procedure with skin-tightening treatment, Renuvion, which I opted for. After the fat removal, your surgeon will insert a thin probe that delivers a combo of helium plasma and radiofrequency to help tighten any loose skin that might result from the procedure.
Does AirSculpt really work?
Yes, AirSculpt really works and permanently removes the fat in the treated area. As long as you maintain a stable weight, that fat loss will last forever. Your AirSculpt outcome will greatly depend on your pre-surgery goals, how much fat you want to remove, your age/skin laxity, and—I can’t stress this enough—your surgeon’s skill and experience.
I’m writing this story four months post-op, which according to doctors, is right around when most patients see final results from their AirSculpt treatment. Exactly when your results kick in—usually between three to six months—will ultimately depend on your anatomy, as well as your personal swelling and bruising tendencies.
My AirSculpt experience:
Step one: Meds taken and numbing applied
After Dr. Schaffner went over my body goals with me and marked the areas he would treat with a surgical pen, he cleaned my body with a disinfecting solution, and my very wonderful nurse had me put on my surgical socks and garments and took me back to the operating room. I was dressed in nothing but nipple covers and a teeny-tiny underwear-like garment covering just the ~essentials~ and was guided to lie on the surgical bed. The room was filled with cool, super-bright white lights—just as unappealing as you’d expect an OR to look. My nurse brought me a Dixie cup of Xanax and antibiotics to calm me and keep any potential infections at bay, and then I got a shot of Demerol in my thigh to relieve pain, and that one was a zinger!
As the medicine was beginning to kick in, and I was entering a state of la la land, I suddenly had the urge to ask my nurse a million and one questions—all of which she very patiently answered in a way that made me so much more comfortable. By the time I was all the way loopy, Dr. Schaffner had come in and created a few 2-millimeter-wide “entry points” with a biopsy punch tool—at this point, I didn’t feel a thing.
Step two: Liposuction begins (and optional skin tightening)
So, I lied. The numbing part isn’t totally over. At this point, even more numbing will be inserted through the entry points, and the leftover fluid that isn’t removed during the procedure will eventually drain out of you during the first few days of recovery. (This fluid is called tumescent anesthesia and is a mixture of lidocaine and epinephrine.) Dr. Schaffner used a “jet injector” to insert the tumescent anesthesia into the fat layer of the target areas to numb the fat cells and prepare for removal.
Once the fat cells are broken up and numbed with the solution, next comes the actual fat-sucking portion. Dr. Schaffner inserted AirSculpt’s 2 mm vibrating cannula into the equally sized entry holes he made on my body prior, and my fat instantly made its way through the tube and into a giant canister. I’m NGL, it was satisfying as f*ck to watch all my fat drain out of me for the next few hours as I sat there as high as a kite.
After about 3.5 hours (Dr. Schaffner took his time; luckily for me, he’s a perfectionist!), we moved on to the final session—skin-tightening with Renuvion. A very thin probe was inserted in the areas that experienced fat removal, and alas, the procedure was over.
QQ: How painful is AirSculpt?
So, here’s the thing: Pain associated with AirSculpt is *truly* dependent on the area you treat and your unique pain tolerance. Cosmo beauty editor Beth Gillette, who treated her chin with AirSculpt, reported absolutely no pain whatsoever. After talking to patients who treated smaller areas as well (like their chins, arms, and little pockets of fat), they felt similarly to Beth.
I did AirSculpt on my upper and lower stomach, waist, and love handles, so my procedure was significantly larger. This being said, I did experience some pretty rough pain when the cannula was around my ribs and belly button. The pain was an 8/10, but again, I was high and every time I felt anything, I would suck the optional laughing gas down. The pain in the troublesome areas lasted less than a minute each time, and the laughing gas provided much-needed relief. But, but! I found myself almost falling asleep when other areas of my body that weren’t as sensitive were being treated. Plus, even though the procedure lasted several hours, it felt as though it was 30 minutes in my head thanks to the medicine.
Step three: Compression garments
When Dr. Schaffner announced the completion of ~le surgery~, I asked the nurse to take photos of my love handles on the table. Immediately, even with some leftover fluid still in my body, the difference was undeniable. From there, Dr. Schaffner exited the room, and a few other nurses were called in to help fit me into my compression garments.
As I was being helped up, I felt very lightheaded—my body just took a beating, this reaction is normal. I had to lie down for a bit more. Once I was steady, with a team effort, the nurses squeezed me into a tight, full-body compression garment, outfitted with maxi pads galore wherever the entry points were—these collected leftover drainage. From there, I was dressed and brought to the swanky recovery room (see below), where I ate, drank, and rested for an hour. When I got the green light to go, my chaperone drove me home and tucked me into bed where I spent the next few hours passed out.
My AirSculpt recovery process:
-
Week one: This week was the toughest; any sort of intense movement felt like I just did a million and one crunches. Though when I say toughest, for what I had done, I was shockingly feeling pretty damn good. Though it would’ve been nice to have someone there, I took care of myself. (Redressing myself with compression garments and showering took probably double the time it would’ve if I had someone.) My biggest complaint this week was all the drainage—for the first few days, after two hours, I’d have to change the mega pad in some areas, and I don’t think people prepare you enough for this part.
-
Week two to three: In week two, I was walking around and even went to the office, though I only made it through half the day; I still wasn’t myself and was dealing with residual drainage. It wasn’t easy hiding the giant pads and compression garments underneath my clothing, so when I needed to leave work, I did. I was still very swollen and couldn’t see the results I did on the table. At this point, it was frustrating. I wanted to get back to my normal self. I could go to work, but there were still so many limitations. I wasn’t able to work out or even go out, I needed rest and recovery time. As I said, my body took a beating, and I got wrapped up in the fact that I was told I’d only need a 48-hour recovery period. That timeline may be true in terms of being bedbound, but it’s important to understand that it’s not realistic for your total healing—healing happens in stages.
-
Week four to six: At about week four, I began to notice the swelling go down day by day—finally, I was beginning to see the effects of the surgery take place. My entry points were pretty much all healed up, and I was on the road to recovery. I could continue my normal activities, though high-impact exercise still hurt my flanks.
-
Week eight to twelve: Between these next four weeks, I noticed the most amount of change. All of a sudden, my pants were way too big on me, and nothing fit the same anymore. Typically, a majority of your swelling will subside in the earlier weeks, but for me, I saw the most significant change between months two and three. In fact, it became a motivator; I started eating healthier and working out more—I was finally feeling 100 percent again.
Recovery tips:
“Any bruising or swelling will subside after a few weeks, and a full recovery with final results will be after three to six months,” says Dr. Schaffner.
Ensure that you wear your compression garment and listen to your post-procedure directions from your surgeon and nurses.
We ask patients to take daily walks as soon as possible but refrain from heavy exercise for a few weeks. For those interested in how soon they can work out, we usually say two weeks, depending on your recovery, but please listen to your body.
Start at a slow pace, and you can gradually increase your activity as you start feeling up to it.
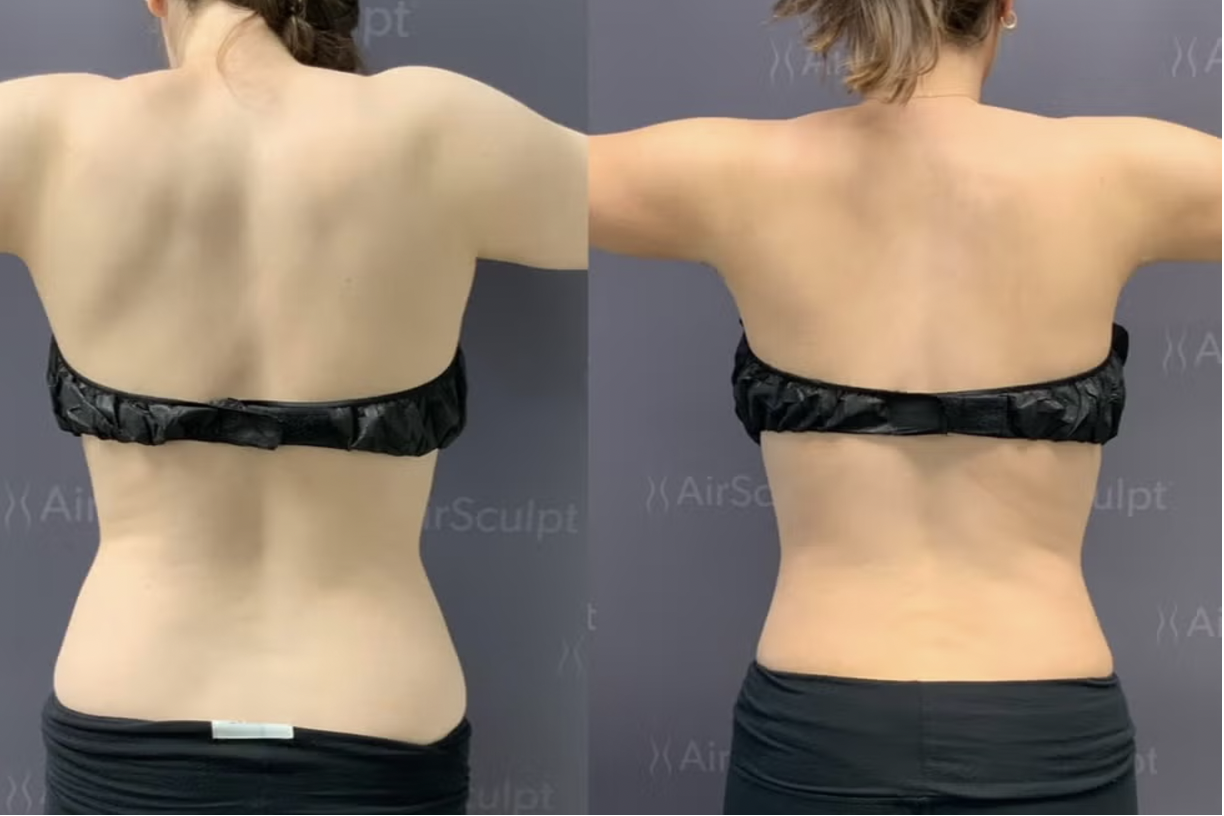
My before-and-after photos:
These photos are four months apart, and I’m wearing low-waisted pants (not my cup of tea), and my love handles have vanished! Note: I lost around 10 pounds in between these few months on my own.